클라우드 네이티브 인 액션(2)
클라우드 네이티브 스프링 인 액션 서적의 데모 프로젝트를 모방하였습니다. 깃 레포지토리
저번 포스팅에서는 간단한 데모프로젝트를 만들어서 도커, 쿠버네티스, 수동 방식으로 실행해보았다.
□ 서버 포트 변경, 연결 타임아웃, 쓰레드 풀 조정
서버 포트 및 연결 타임아웃, 설정들은 application.yml , application.properties에서 변경할 수 있다.
1
2
3
4
5
6
7
8
9
10
11
12
# 포트 9001
server.port=9001

# 연결타임아웃 2s default 20s
server.tomcat.connection-timeout=2s
# 연결 유지시간 15s
server.tomcat.keep-alive-timeout=15s

# 최대 쓰레드 50개, default 200
server.tomcat.threads.max=50
# 최소 쓰레드 5개, default 10
server.tomcat.threads.min-spare=5
이렇게 설정한 이유는 간단하다. 로컬에서 혼자 개발할 때는 쓰레드를 200개까지 늘릴 필요도 없고 타임아웃을 20초로 설정해서 개발할 일이 해당 프로젝트에서는 없기 때문이다.
□ Record자료형을 이용한 도메인 정의
1
2
3
4
5
6
public record Book(
        String isbn,
        String title,
        String author,
        Double price
) { }
특이한 것은 Record자료형을 사용한 것인데, 보일러 플레이트 코드를 줄이기 위함으로 사용된 것으로 추정된다.
□ Book Service 구현
1
2
3
4
5
6
7
8
9
10
11
12
13
14
15
16
17
18
19
20
21
22
23
24
25
26
27
28
29
30
31
32
33
34
35
36
37
38
39
40
41
@Service
public class BookService {
    private final BookRepository bookRepository;

    public BookService(BookRepository bookRepository){
        this.bookRepository = bookRepository;
    }

    public Iterable<Book> viewBookList() {
        return bookRepository.findAll();
    }

    public Book viewBookDetail(String isbn) {
        return bookRepository.findByIsbn(isbn).orElseThrow(() -> new BookNotFoundException(isbn));
    }

    public Book addBookToCatalog(Book book) {
        if(bookRepository.existsByIsbn(book.isbn())) {
            throw new BookAlreadyExistsException(book.isbn());
        }
        return bookRepository.save(book);
    }

    public void removeBookFromCatalog(String isbn) {
        bookRepository.deleteByIsbn(isbn);
    }

    public Book editBookDetails(String isbn, Book book) {
        return bookRepository.findByIsbn(isbn)
                .map(existingBook -> {
                    var bookToUpdate = new Book(
                            existingBook.isbn(),
                            book.title(),
                            book.author(),
                            book.price());
                    return bookRepository.save(bookToUpdate);
                })
                .orElseGet(() -> addBookToCatalog(book));
    }

}
- 생성자 주입을 사용한다
- Custom Error를 발생시킨다.
- 람다와
var라는 자료형이 쓰인다.
라는것을 중심적으로 보면된다.
□ 레포지토리 추상화 및 구현
1
2
3
4
5
6
7
8
9

public interface BookRepository {
    Iterable<Book> findAll();
    Optional<Book> findByIsbn(String isbn);
    Boolean existsByIsbn(String isbn);
    Book save(Book book);
    void deleteByIsbn(String isbn);
}
레포지토리를 추상화하는 이유는 도메인 계층에서는 데이터가 어떻게 저장되는지 등에 대한 정보를 알 필요가 없기에 인터페이스로 분리해내는것이라고 한다.
1
2
3
4
5
6
7
8
9
10
11
12
13
14
15
16
17
18
19
20
21
22
23
24
25
26
27
28
29
30
31
32
33
//구현

@Repository
public class InMemoryBookRepository implements BookRepository {

    private static final Map<String,Book> books = new ConcurrentHashMap<>();

    @Override
    public Iterable<Book> findAll() {
        return books.values();
    }

    @Override
    public Optional<Book> findByIsbn(String isbn) {
        return existsByIsbn(isbn) ? Optional.of(books.get(isbn)) : Optional.empty();
    }

    @Override
    public Boolean existsByIsbn(String isbn) {
        return books.get(isbn) != null;
    }

    @Override
    public Book save(Book book) {
        books.put(book.isbn(), book);
        return book;
    }

    @Override
    public void deleteByIsbn(String isbn) {
        books.remove(isbn);
    }
}
Map을 이용한 인메모리 데이터 저장소로, ConcurrentHashMap을 사용한 것은 동시성을 고려한 것이지 않나 판단된다.
또한 Optional에 대한 문법이 등장하기에 같이 학습하는것도 좋을 것 같다.
□ 커스텀 에러 코드 작성
1
2
3
4
5
6
7
8
package com.polarbookshop.catalogservice.domain;

public class BookAlreadyExistsException extends RuntimeException{
    public BookAlreadyExistsException(String isbn){
        super("A book with ISBN" + isbn + "already exists.");
    }
}
1
2
3
4
5
6
7
8
9
package com.polarbookshop.catalogservice.domain;

public class BookNotFoundException extends RuntimeException{

    public BookNotFoundException(String isbn){
        super("A book with ISBN" + isbn + "was not found.");
    }
}
특이한 점은 없다.
□ 컨트롤러 정의
1
2
3
4
5
6
7
8
9
10
11
12
13
14
15
16
17
18
19
20
21
22
23
24
25
26
27
28
29
30
31
32
33
34
35
36
37
38
39
40
41
42
43
44
45
package com.polarbookshop.catalogservice.web;

import com.polarbookshop.catalogservice.domain.Book;
import com.polarbookshop.catalogservice.domain.BookService;
import jakarta.validation.Valid;
import org.springframework.http.HttpStatus;
import org.springframework.web.bind.annotation.*;

@RestController
@RequestMapping("books")
public class BookController {
    private final BookService bookService;

    public BookController(BookService bookService){
        this.bookService = bookService;
    }

    @GetMapping
    public Iterable<Book> get(){
        return bookService.viewBookList();
    }

    @GetMapping("{isbn}")
    public Book getByIsbn(@PathVariable String isbn) {
        return bookService.viewBookDetail(isbn);
    }

    @PostMapping
    @ResponseStatus(HttpStatus.CREATED)
    public Book post(@RequestBody Book book) {
        return bookService.addBookToCatalog(book);
    }

    @DeleteMapping("{isbn}")
    @ResponseStatus(HttpStatus.NO_CONTENT)
    public void delete(@PathVariable String isbn) {
        bookService.removeBookFromCatalog(isbn);
    }

    @PutMapping("{isbn}")
    public Book put(@PathVariable String isbn, @RequestBody Book book) {
        return bookService.editBookDetails(isbn, book);
    }
}
마찬가지로 특이하게 어려운 점은 없는 코드다.
□ 요청 테스트
책에서는 HTTPie라는 것을 사용하고있다. 개인적으로 POSTMan이 더 편하지만 아무튼 책에 나와있어서 테스트해보았다.
HTTPie는 API 요청하는 도구이다.
mac에서 이를 다운받으라면
brew install httpie 로 받으면 된다
요청은
1
2
3
4
5
6
7
8
9
10
11
12
13
14
15
16
17
> http POST :9001/books author="Lyra Silverstar" \
title="Northern Lights" isbn="1234567891" price=9.98


HTTP/1.1 201
Connection: keep-alive
Content-Type: application/json
Date: Thu, 04 Jul 2024 13:59:50 GMT
Keep-Alive: timeout=60
Transfer-Encoding: chunked

{
    "author": "Lyra Silverstar",
    "isbn": "1234567891",
    "price": 9.98,
    "title": "Northern Lights"
}
이렇게 보내면 된다.
□ 데이터 유효성 검사 및 오류 처리
현재 코드는 데이터 유효성 검사가 적용되지 않아서, book에 대한 정보가 비어있어도 요청을 받고 있다.
따라서 데이터 유효성 검사를 해줘야한다.
1
2
3
4
5
6
7
8
9
10
11
12
13
14
15
16
17
public record Book(
        @NotBlank(message = "The book ISBN must be defined")
        @Pattern(
                regexp = "^([0-9]{10}|[0-9]{13})$",
                message = "The ISBN format must be valid"
        )
        String isbn,
        @NotBlank(
                message = "The book title must be defined."
        )
        String title,
        @NotBlank(message = "The book author must be defined.")
        String author,
        @NotNull(message = "The book price must be defined.")
        @Positive(message = "The book price must be greater than zero.")
        Double price
) { }
위에서는 정규 표현식이 나오는데, 내용은 0~9 숫자 10자 *또는8 0~9 숫자 13자가 들어와야한다는 뜻이다.
@Positive는 널 값이 아니여야하고 0보다 큰 값을 가져야한다.
해당 오류를 감지하고 처리할 수 있도록 어드바이스 클래스를 작성해야한다.
그 전에, 컨트롤러가 이를 감지할 수 있도록 어노테이션을 추가하여 수정한다.
1
2
3
4
5
6
7
8
9
10
@PostMapping
@ResponseStatus(HttpStatus.CREATED)
public Book post(@Valid @RequestBody Book book) {
    return bookService.addBookToCatalog(book);
}

@PutMapping("{isbn}")
public Book put(@PathVariable String isbn, @Valid @RequestBody Book book) {
    return bookService.editBookDetails(isbn, book);
}
1
2
3
4
5
6
7
8
9
10
11
12
13
14
15
16
17
18
19
20
21
22
23
24
25
26
27
28
@RestControllerAdvice
public class BookControllerAdvice {

    @ExceptionHandler(BookNotFoundException.class)
    @ResponseStatus(HttpStatus.NOT_FOUND)
    String bookNotFoundHandler (BookNotFoundException e) {
        return e.getMessage();
    }

    @ExceptionHandler(BookAlreadyExistsException.class)
    @ResponseStatus(HttpStatus.UNPROCESSABLE_ENTITY)
    String bookAlreadyExistsHandler (BookAlreadyExistsException e) {
        return e.getMessage();
    }

    @ExceptionHandler(MethodArgumentNotValidException.class)
    @ResponseStatus(HttpStatus.BAD_REQUEST)
    public Map<String, String> handleMethodArgumentNotValidException (MethodArgumentNotValidException e) {
        var errors = new HashMap<String,String>();
        // 빈 메시지 대신 의미 있는 오류 메시지를 위해 유효하지 않은 필드를 확인하는 코드
        e.getBindingResult().getAllErrors().forEach(error -> {
            String fieldName = ((FieldError) error).getField();
            String errorMessage = error.getDefaultMessage();
            errors.put(fieldName, errorMessage);
        });
        return errors;
    }
}
마찬가지로 크게 어려운 코드는 아니다.
유효성 검사가 제대로 되는지 확인해보려면 위에서 작성한 정규식 패턴을 파훼하는 isbn을 넣어주면 된다.
1
2
3
4
5
6
7
8
9
10
11
12
13
14
> http POST :9001/books author="Jon Snow" title="" isbn="123ABC4562" price=9.98

HTTP/1.1 400
Connection: close
Content-Type: application/json
Date: Sun, 07 Jul 2024 06:39:38 GMT
Transfer-Encoding: chunked

{
    "isbn": "The ISBN format must be valid",
    "title": "The book title must be defined."
}
□ 단위 테스트 작성
spring-boot-stater-test라이브러리를 이용하여 Junit5, Mokito, AssertJ등을 이용하여 테스트 코드를 작성한다.
1
2
3
4
5
6
7
8
9
10
11
12
13
14
15
16
17
18
19
20
21
22
23
24
25
26
27
28
29
30
31
32
33
34
35
36
37
package com.polarbookshop.catalogservice.domain;

import jakarta.validation.ConstraintViolation;
import jakarta.validation.Validator;
import jakarta.validation.Validation;
import jakarta.validation.ValidatorFactory;
import org.junit.jupiter.api.BeforeAll;
import org.junit.jupiter.api.Test;

import java.util.Set;

import static org.assertj.core.api.Assertions.assertThat;

class BookValidationTests {
    private static Validator validator;

    @BeforeAll
    static void setUp() {
        ValidatorFactory factory = Validation.buildDefaultValidatorFactory();
        validator = factory.getValidator();
    }

    @Test
    void whenAllFieldsCorrectThenValidationSucceeds() {
        var book = new Book("1234567890", "Title", "Author", 9.90);
        Set<ConstraintViolation<Book>> constraintViolations = validator.validate(book);
        assertThat(constraintViolations).isEmpty();
    }

    @Test
    void whenIsbnDefinedButIncorrectThenValidationFails() {
        var book = new Book("a2345768", "title", "author", 9.98);
        Set<ConstraintViolation<Book>> violations = validator.validate(book);
        assertThat(violations).hasSize(1);
        assertThat(violations.iterator().next().getMessage()).isEqualTo("The ISBN format must be valid");
    }
}
ValidatorFactory는 유호성 검증을 하기위한 Validator를 관리하는 인스턴스이다.
이를 통해 Controller에서 작성한 @Valid를 감지하고 검증할 수 있다.
□ 통합 테스트
테스틀 위한 모의 웹 환경을 만들기 위해서 @SpringBootTest애노테이션을 이용한다. 모의 웹 환경을 이용하면 MockMvc 객체를 통해서 HTTP 요청을 보내고 결과를 확인할 수 있다.
옛날에는 MockMvc, TestRestTemplate라는 것을 이용하였는데, 현대에는 WebTestClient라는 현대적이고 풍부한 API를 제공하는 클래스를 사용한다.
이를 사용하기 위해서는 의존성을 추가해야한다.
1
testImplementation 'org.springframework.boot:spring-boot-starter-webflux'
통합 테스트 코드 작성
1
2
3
4
5
6
7
8
9
10
11
12
13
14
15
16
17
18
19
20
21
22
23
24
25
//임의의 포트를 듣는 서블릿 컨테이너 로드
@SpringBootTest(
        webEnvironment = SpringBootTest.WebEnvironment.RANDOM_PORT
)
class BookControllerTest {

    @Autowired
    private WebTestClient webTestClient;

    @Test
    void whenPostRequestThenBookCreate() {
        var expectedBook = new Book("1231231231","title","author",9.54);

        webTestClient
                .post()
                .uri("/books")
                .bodyValue(expectedBook)
                .exchange()
                .expectStatus().isCreated()
                .expectBody(Book.class).value(actualBook -> {
                    assertThat(actualBook).isNotNull();
                    assertThat(actualBook.isbn()).isEqualTo(expectedBook.isbn());
                });
    }
}
코드에서 사용되는 메서드들이 직관적이므로 따로 설명을 적지는 않겠다.
@WebMvcTest를 이용한 Rest 컨트롤러 테스트
위의 테스트경우 통합테스트로 데이터 지속성 계층까지 로드 되었지만 컨트롤러만 테스트하고 싶을 때가 있을 수 있다.
이를 위해 제공되는 것이 WebMvcTest 애노테이션으로, 모의 웹 환경에서 콘택스트를 로드하고 MVC계층에서 사용되는 빈만 포함하게 된다.
1
2
3
4
5
6
7
8
9
10
11
12
13
14
15
16
17
18
@WebMvcTest(BookController.class)
public class BookControllerMvcTest {

    @Autowired
    private MockMvc mockMvc;

    @MockBean
    private BookService bookService;

    @Test
    void whenGetBookNotExistingThenShouldReturn404() throws Exception {
        String isbn = "9987799877";
        given(bookService.viewBookDetail(isbn))
                .willThrow(BookNotFoundException.class);
        mockMvc.perform(get("/books/" + isbn))
                .andExpect(status().isNotFound());
    }
}
선할 때에는 명시적으로 어떤 클래스를 타깃으로 테스트할 것인지 명시해주면된다.
MockMvc는 톰캣과 같은 서버를 로드하지 않고도 웹 엔드포인트를 테스트할 수 있는 유틸리티 클래스이다. 실제 임베디드 서버를 띄우지 않았기에 위의 테스트보다는 경량적이다.
@JsonTest
API 테스트까지 진행하면 해당 데이터들을 제대로 받았는지 등에 대한 직렬화, 역직렬화 테스트를 진행할 수 있다.
1
2
3
4
5
6
7
8
9
10
11
12
13
14
15
16
17
18
19
20
21
22
23
24
25
26
27
28
29
30
31
32
33
34
35
36
37
38
39
40
41
42
43
44
45
import com.polarbookshop.catalogservice.domain.Book;
import org.junit.jupiter.api.Test;
import org.springframework.beans.factory.annotation.Autowired;
import org.springframework.boot.test.autoconfigure.json.JsonTest;
import org.springframework.boot.test.json.JacksonTester;

import static org.assertj.core.api.Assertions.assertThat;

@JsonTest
public class BookJsonTest {

    @Autowired
    private JacksonTester<Book> jacksonTester;

    @Test
    void testSerialize() throws Exception{
        var book = new Book("1234567890","title", "author", 9.01);
        var jsonContent= jacksonTester.write(book);


        assertThat(jsonContent).extractingJsonPathStringValue("@.isbn")
                .isEqualTo(book.isbn());
        assertThat(jsonContent).extractingJsonPathStringValue("@.title")
                .isEqualTo(book.title());
        assertThat(jsonContent).extractingJsonPathStringValue("@.author")
                .isEqualTo(book.author());
        assertThat(jsonContent).extractingJsonPathNumberValue("@.price")
                .isEqualTo(book.price());
    }

    @Test
    void testDeserialize() throws Exception {
        var content = """
                {
                    "isbn": "1234567890",
                    "title": "minseok book",
                    "author": "minseok",
                    "price": 9.14
                }
                """;
        assertThat(jacksonTester.parse(content))
                .usingRecursiveComparison()
                .isEqualTo(new Book("1234567890", "minseok book", "minseok", 9.14));
    }
}
JsonTest코드도 코드 자체는 직관적이기에 어렵지는 않다.
□ 배포 파이프라인 빌드 & 테스트
책에서는 Github Actions를 사용해서 배포 빌드 스크립트를 구성한다.
또, 취약점을 스캔하는 스크립트도 추가하고 있다.
1
2
3
4
5
6
7
8
9
10
11
12
13
14
15
16
17
18
19
20
21
22
23
24
25
26
27
28
29
30
31
32
33
34
35
36
37
38
39
40
name: Commit Stage
on: push

jobs:
  build:
    env:
      catalog-directory: catalog-service

    name: Build and Test
    runs-on: ubuntu-22.04
    permissions:
      contents: read
      security-events: write
    steps:
      - name: Checkout source code
        uses: actions/checkout@v3
      - name: Set up JDK
        uses: actions/setup-java@v3
        with:
          distribution: temurin
          java-version: 17
          cache: gradle
      - name: Code vulnerability scanning
        uses: anchore/scan-action@v3
        id: scan
        with:
          path: "$"
          fail-build: false
          severity-cutoff: high
          acs-report-enable: true
      - name: Upload vulnerability report
        uses: github/codeql-action/upload-sarif@v3
        if: success() || failure()
        with:
          sarif_file: $
      - name: Build, unit tests and integrations tests
        run: |
          chmod +x gradlew
          ./gradlew build
        working-directory: $
이후 git push작업이 진행된다면
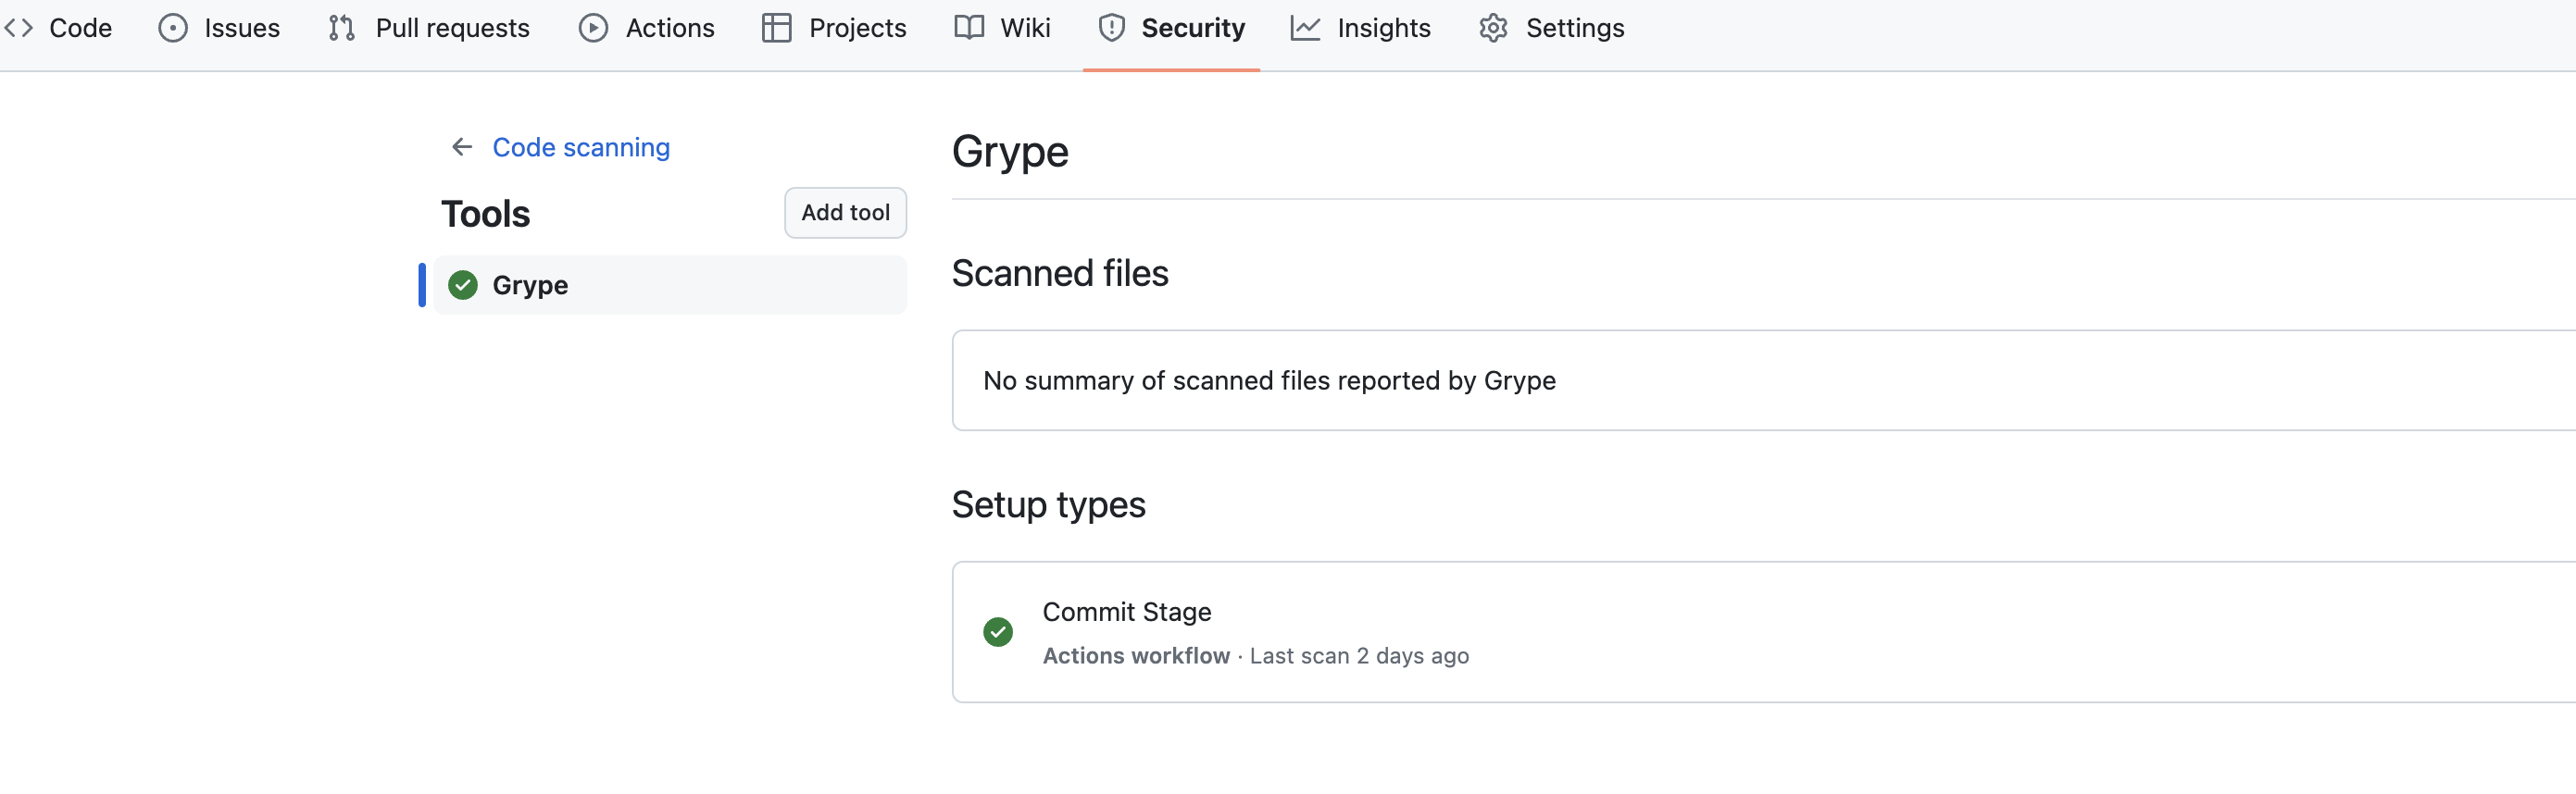
위와 같이 Security 탭에서 확인할 수 있다.
지금까지 3장의 내용이였다.
코드 위주로 포스팅을 작성하였는데, 내용이 크게 어렵지도 않고 하나하나 건드려가면서 설명하기엔 양도 많다.
아마 내용이 좀 어려워진다면 나눠서 포스팅해서 자세히 적지 않을까 싶다.