Spring_JPA1 - 프로젝트 환경설정
해당 자료는 인프런 김영한 선생님의 실전! 스프링 부트와 JPA 활용 1 강의노트입니다.
Spring 환경설정 만드는 예제는 옛날에도 작성했으므로 환경설정에서 전에 작성한 내용은 글로 설명하겠습니다.
1. 프로젝트 생성
프로젝트 생성은 https://start.spring.io/에서 할 수 있습니다.
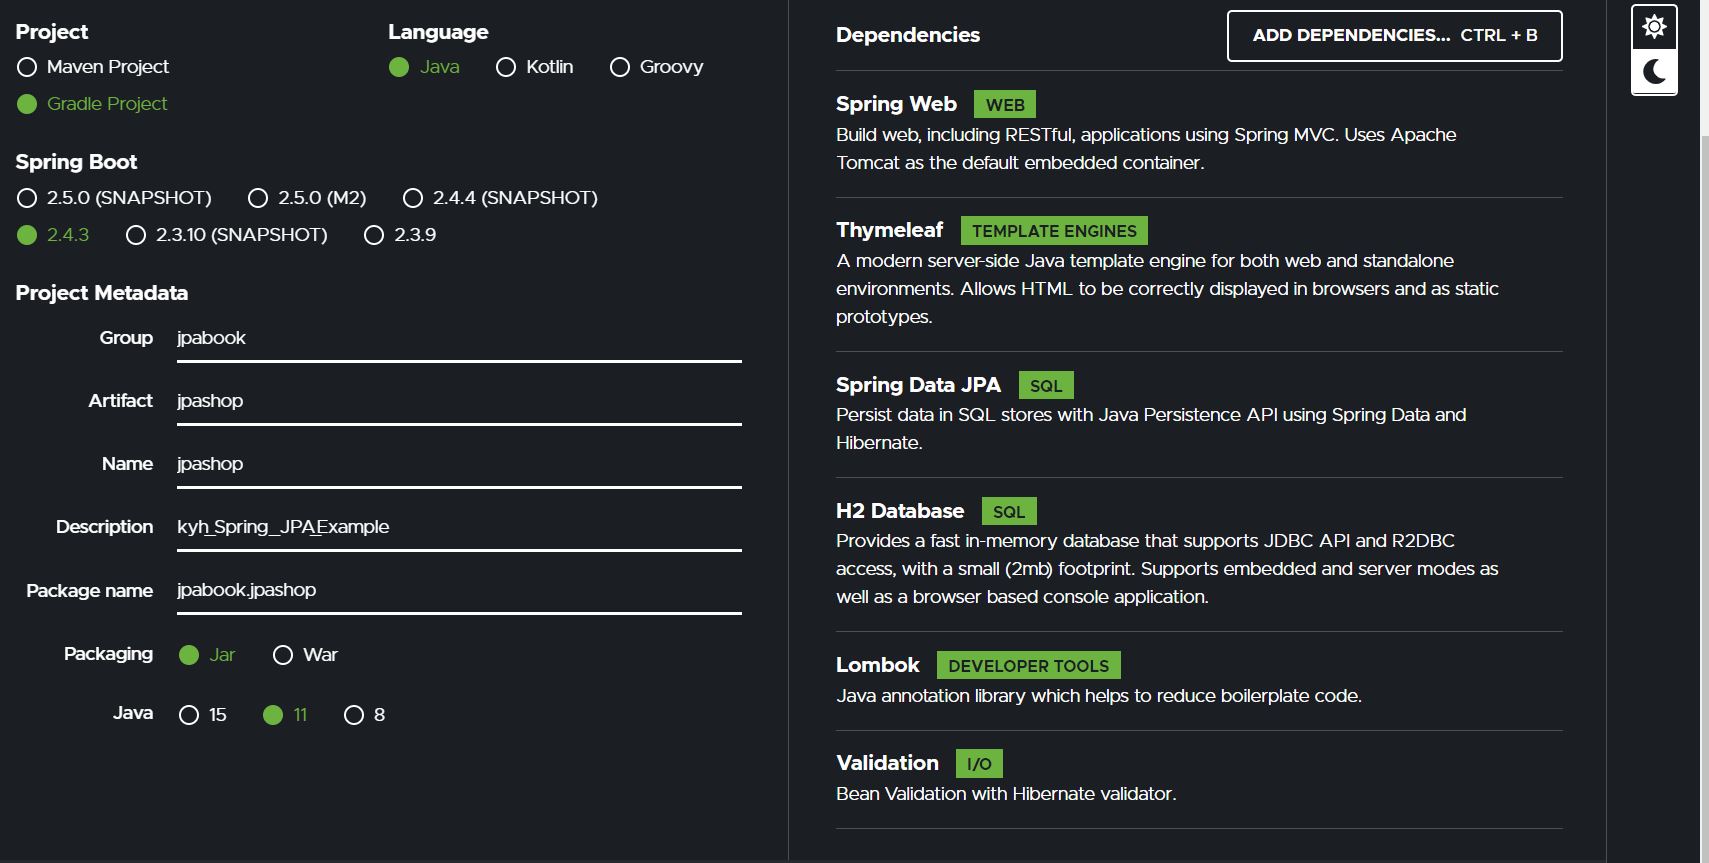
위와 같은 설정을 갖고,
Dependencies는
- web
- thymeleaf
- jpa
- h2
- lombok
- validation
을 검색하여 추가합니다.
IntellJ에서 import를 해줘서 라이브러리를 다운받고, 해당 강의에서 JUnit4를 사용하므로(최신버전이 아님) ‘build.gradle’ 파일을 수정해줘야합니다.
1
2
3
4
5
6
7
8
9
10
11
12
13
14
15
16
17
18
19
20
21
22
23
24
25
26
27
28
29
30
31
32
33
34
35
36
37
38
39
40
41
42
43
44
45
46
47
48
49
//JUnit4 추가
	testImplementation("org.junit.vintage:junit-vintage-engine"){
		exclude group: "org.hamcrest", module : "hamcrest-core"
	}


//전체코드
plugins {
	id 'org.springframework.boot' version '2.4.3'
	id 'io.spring.dependency-management' version '1.0.11.RELEASE'
	id 'java'
}

group = 'jpabook'
version = '0.0.1-SNAPSHOT'
sourceCompatibility = '11'

configurations {
	compileOnly {
		extendsFrom annotationProcessor
	}
}

repositories {
	mavenCentral()
}

dependencies {
	implementation 'org.springframework.boot:spring-boot-starter-data-jpa'
	implementation 'org.springframework.boot:spring-boot-starter-thymeleaf'
	implementation 'org.springframework.boot:spring-boot-starter-validation'
	implementation 'org.springframework.boot:spring-boot-starter-web'

	compileOnly 'org.projectlombok:lombok'
	runtimeOnly 'com.h2database:h2'

	annotationProcessor 'org.projectlombok:lombok'
	testImplementation 'org.springframework.boot:spring-boot-starter-test'

	//JUnit4 추가
	testImplementation("org.junit.vintage:junit-vintage-engine"){
		exclude group: "org.hamcrest", module : "hamcrest-core"
	}
}

test {
	useJUnitPlatform()
}
main method()를 실행하고 http://localhost:8080에 접속하여 환경이 잘 적용되었는 지 확인합니다.
1
2
3
4
5
Whitelabel Error Page
This application has no explicit mapping for /error, so you are seeing this as a fallback.

Mon Mar 15 15:38:01 KST 2021
There was an unexpected error (type=Not Found, status=404).
와 비슷한 페이지가 뜨면 적용이 된것입니다.
lombok 적용
https://kkminseok.github.io/posts/SpringPoint09/ 에서 lombok환경세팅과 lombok이 뭔지에 대한 글을 썼으니 참고하여 셋팅합니다.
간단한 클래스를 하나 만들어 다음과 같이 적어줍니다. 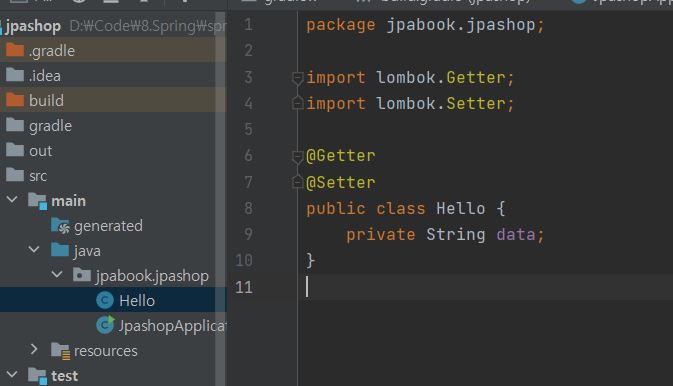
mainclass로 가서 다음과 같이 코드를 작성하고 실행해서 ‘hi’가 뜨면 성공입니다.
1
2
3
4
5
6
7
8
9
10
11
12
13
14
15
16
17
18
19
20
package jpabook.jpashop;

import org.springframework.boot.SpringApplication;
import org.springframework.boot.autoconfigure.SpringBootApplication;

@SpringBootApplication
public class JpashopApplication {

	public static void main(String[] args) {

		Hello hello = new Hello();
		hello.setData("hi");
		String temp = hello.getData();
		System.out.println("temp = " + temp);

		SpringApplication.run(JpashopApplication.class, args);
	}

}
누락된 내용이 있을 수도 있으니 https://kkminseok.github.io/posts/SpringPoint2/도 참고해서 셋팅해야합니다.
2. 라이브러리 보는 법
생략
3. View 환경설정
이 강의에서는 템플릿 엔진으로 thymeleaf를 사용합니다.
- thymeleaf 공식 사이트: https://www.thymeleaf.org/
예제는 https://kkminseok.github.io/posts/Springnovice3/와 비슷 합니다.
만약 html 파일을 수정한다면 서버를 재시작해서 확인해야합니다.
불필요한 작업을 줄이기 위해
‘build.gradle’ 파일에 다음 코드를 추가해줍니다.
1
	implementation 'org.springframework.boot:spring-boot-devtools'
devtools는 개발할 때 도움이 되는 도구들을 제공합니다.

위와 같이 재실행 했을 때 [restartedMain]~이라고 뜨면 성공입니다.
앞으로는 서버를 재실행하지 않고 위의 ‘build’ -> ‘Recompile’ 버튼을 눌러주면 변경사항이 적용됩니다.
4. H2 DB 설정
내용이 중복이므로 https://kkminseok.github.io/posts/Springnovice8/를 참고해서 설정하면 됩니다.
5. JPA, DB 설정 확인
강의에서는 ‘application.properties’가 아닌 ‘application.yml’파일을 사용하므로 application.properties를 삭제하고 apllication.yml 파일을 resources폴더 밑에 만들어줍니다.
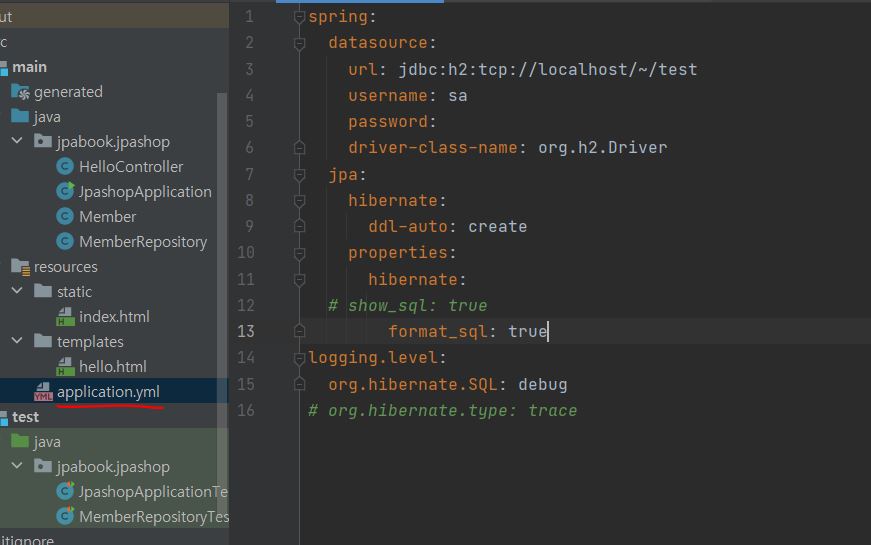
내용이 굉장히 중요한데, yml은 2칸씩 띄워줘야 계층을 만듭니다. 때문에 띄어쓰기 + 오타 관리를 잘해야합니다.. 이걸로 나중에 테스트 코드에서 오류가 많이납니다.
대표적인 오류는 ‘Failed to load ApplcationContext’입니다.
yml 파일 내용입니다.
1
2
3
4
5
6
7
8
9
10
11
12
13
14
15
16
17
18
spring: #띄어쓰기 없음
  datasource: #띄어쓰기 2칸
    url: jdbc:h2:tcp://localhost/~/jpashop #4칸
    username: sa
    password:
    driver-class-name: org.h2.Driver
  jpa: #띄어쓰기 2칸
    hibernate: #띄어쓰기 4칸
      ddl-auto: create #띄어쓰기 6칸
    properties: #띄어쓰기 4칸
      hibernate: #띄어쓰기 6칸
        # sout로 로그를 찍는데 권장하지 않습니다.
        # show_sql: true #띄어쓰기 8칸
        format_sql: true #띄어쓰기 8칸
logging.level: #띄어쓰기 없음
    #hibernater를 이용해서 로그를 찍습니다.
  org.hibernate.SQL: debug #띄어쓰기 2칸
# org.hibernate.type: trace #띄어쓰기 2칸
다음 테스트를 위해 Member.java 파일을 만들어줍니다.
1
2
3
4
5
6
7
8
9
//Member.java
@Entity
@Getter @Setter
public class Member {

    @Id @GeneratedValue
    private Long id;
    private String username;
}
Member를 등록할 간단한 저장소를 만듭니다.
1
2
3
4
5
6
7
8
9
10
11
12
13
14
15
16
//MemberRepository.java
@Repository
public class MemberRepository {

    @PersistenceContext
    EntityManager em;

    public Long save(Member member){
        em.persist(member);
        return member.getId();
    }

    public Member find(Long id){
        return em.find(Member.class,id);
    }
}
이후 window 기준 ctrl + shift + t 키를 이용해서 테스트파일을 만드는데, 강의에서 Junit4를 사용해서 Junit4버전으로 만들었습니다.
1
2
3
4
5
6
7
8
9
10
11
12
13
14
15
16
17
18
19
20
21
22
23
24
25
26
27
28
29
30
31
32
33
34
35
36
//MemberTest.java 파일

//스프링부트에게 알리는 방식이라고 합니다.
@RunWith(SpringRunner.class)
@SpringBootTest
public class MemberRepositoryTest {

    //불러오기
    @Autowired MemberRepository memberRepository;

    @Test
    //밑의 애노테이션이 없으면 오류가 납니다.
    @Transactional
    //false옵션 사용 시 실제 DB에 테스트한 값이 남습니다. Rollback 애노테이션을 지우면 테스트 이후 DB를 롤백해 DB에 자료가 남지 않습니다.
    @Rollback(value = false)
    public  void testMember(){
        //member 객체 생성
        Member member = new Member();
        member.setUsername("KMS");
        Long saveId = memberRepository.save(member);
        //DB에 저장완료

        //DB에서 찾아봅니다.
        Member findMember = memberRepository.find(saveId);

        //DB에서 찾은 객체의 Id와 DB에 넣기로한 객체와 Id가 같은지 확인합니다.
        Assertions.assertThat(findMember.getId()).isEqualTo(member.getId());

        //마찬가지
        Assertions.assertThat(findMember.getUsername()).isEqualTo(member.getUsername());

        //Ok가 뜹니다.
        Assertions.assertThat(findMember).isEqualTo(member);

    }
}
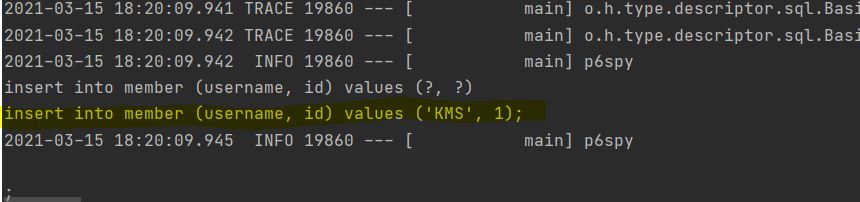
참고로 yml파일의 마지막줄에서 작성한 주석문을 제거하고,
build.gradle 파일의 의존성에 다음 코드를 추가하면 로그에 어떤데이터가 들어갔는 지 확인할 수 있습니다. (추가하지 않으면 확인이 불가)
1
2
#build.gradle 파일
implementation 'com.github.gavlyukovskiy:p6spy-spring-boot-starter:1.5.6'
p6spy라고 불리는데, 다음과 같이 로그를 찍어줍니다.
하지만 성능이 느려질 수 있으니 개발 단계에서 사용하고, 운영 단계에서는 성능 테스트를 거치라고 하셨습니다.