Spring - 6 컴포넌트 스캔
해당 자료는 인프런 김영한 선생님의 스프링-핵심-원리-기본편 강의노트입니다.
1. 컴포넌트 스캔과 의존관계 자동 주입 시작하기
지금까지는 수동으로 @Bean, XML 같은 경우는
하지만 이러한 설정정보가 수백 수천가지가 된다면 매 번 적어주는 것은 매우 힘든 일입니다.
그래서 스프링은 자동으로 스프링 빈으로 등록하는 컴포넌트 스캔기능을 제공합니다.
또한 의존관계를 자동으로 주입해주는 @Autowired 기능도 제공합니다.
테스트를 위해 새로운 AutoAppConfig.java 파일을 만들겠습니다.
1
2
3
4
5
6
7
8
9
10
11
12
13
14
15
16
17
18
19
20
package hello.core;

import org.springframework.context.annotation.ComponentScan;
import org.springframework.context.annotation.Configuration;
import org.springframework.context.annotation.FilterType;

import static org.springframework.context.annotation.ComponentScan.*;


//ComponentScan 에 들어있는 코드는 이미 다른 곳에서 등록한 빈들을 제외하고 스캔하라는 뜻입니다.
@Configuration
@ComponentScan(
        excludeFilters = @Filter(type = FilterType.ANNOTATION, classes = Configuration.class)
)
public class AutoAppConfig {
    //컴포넌트 스캔을 사용하면 @Configuration이 붙은 설정 정보도 자동으로 등록되기에 Appconfig, TestConfig 설정정보도 같이 등록됩니다.
    //'excludeFilters'를 사용해 위의 설정정보들을 제외하고 스캔합니다. 보통 잘 사용하지 않는다고 합니다.
    //@Configuration이 스캔 대상이 된 것은 그 안에 @Componet 애노테이션이 붙어있기 때문입니다.
}
설정을 해주기 위해 사용하들 구현체들에게 @Component, 생성자에는 @Autowired를 달아줍니다.
1
2
3
4
5
6
7
8
9
10
11
//MemberServiceImpl.java

@Component
public class MemberServiceImpl implements MemberService{

    private final MemberRepository memberRepository;

    @Autowired
    public MemberServiceImpl(MemberRepository memberRepository) {
        this.memberRepository = memberRepository;
    }
이런 식으로 ‘OrderServiceImpl’, ‘RateDiscountPolicy’ 자바파일에도 붙여줍니다.
테스트를 위해 새로운 테스트파일인, ‘AutoAppConfigTest’ 파일을 만들어 줍니다.
1
2
3
4
5
6
7
8
9
10
11
12
13
14
15
16
17
18
19
20
21
package hello.core.scan;

import hello.core.AutoAppConfig;
import hello.core.member.MemberService;
import org.assertj.core.api.Assertions;
import org.junit.jupiter.api.Test;
import org.springframework.context.ApplicationContext;
import org.springframework.context.annotation.AnnotationConfigApplicationContext;


public class AutoAppConfigTest {

    @Test
    void basicScan(){
        ApplicationContext ac = new AnnotationConfigApplicationContext(AutoAppConfig.class);
        MemberService memberService = ac.getBean(MemberService.class);
        Assertions.assertThat(memberService).isInstanceOf(MemberService.class);

    }

}
코드에 대한 설명을 하자면, 아무것도 적어주지 않은 AutoAppConfig을 설정정보로 넣어도 컴포넌트 스캔과 Autowired덕에 빈에서 잘 꺼내는 것을 볼 수 있습니다.
그리고 로그도 아주 친절하게 나옵니다.
무엇이 등록되고, 무엇이 싱글톤으로 생겨났고, 의존관계 주입이 어떤식으로 되었다라고 나옵니다.
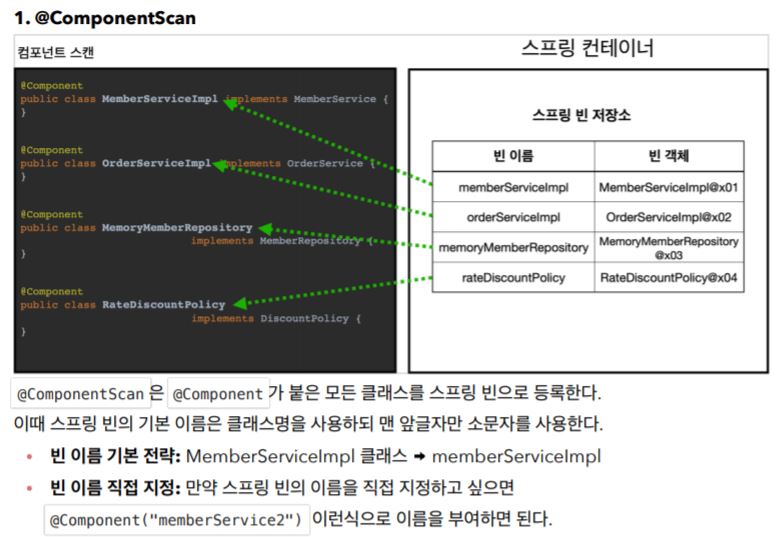
@ComponentScan이 어떻게 동작하는 지 친절하게 알려주십니다.
출처 : 김영한 선생님 강의자료
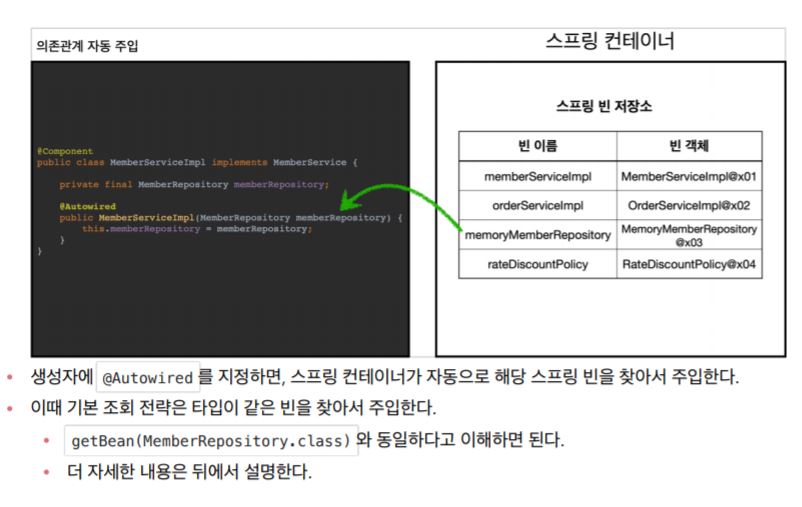
@Autowired가 어떻게 동작하는 지 보여줍니다.
출처 : 김영한 선생님 강의자료
이러한 컴포넌트 스캔과 Autowired는 제약이 꽤 있을 것 같다고 생각하는데, 그에 대한 내용은 뒤에서 다뤄주신다고 합니다.
2. 탐색 위치와 기본 스캔 대상
모든 자바 클래스를 스캔하려면 오래걸립니다. 그래서 범위를 지정해줄 수 있습니다.
1
2
3
4
5
6

@ComponentScan{
    basePackages = {"hello.core","hello.serivce"}//패키지명
    //or
    basePackages = "hello.core"
}
‘basePackages’는 탐색할 패키지의 위치를 지정합니다. 이 패키지를 포함해서 하위 패키지 모두를 탐색합니다.
권장하는 방법
패키지 위치를 지정하지 않고, 설정 정보 클래스를 프로젝트의 최상단에 두어 그 하위계층을 모두 탐색하게 만듭니다.
최근 스프링 부트도 이러한 방식을 제공하고 있습니다.
- com.hello
- com.hello.service
- com.hello.controller
이런식으로 되어 있다면 com.hello에 설정파일을 두어 스캔하는 것입니다.
참고로 스프링 부트의 메인 메소드에 ‘@SpringBootApplication’ 애노테이션이 붙어있는데 위와 같은 방식입니다.
컴포넌트 스캔은 @Component 뿐만 아니라 다음과 같은 내용도 추가로 대상에 포함시킵니다.
- @Component
- @Controller : 스프링 MVC컨트롤러에서 사용
- @Service : 스프링 비즈니스 로직에 사용, 특별한 처리는 안하지만 사람들이 볼 때 여기에 비즈니스 로직이 있겠구나 인식을 도와줌.
- @Repository : 스프링 데이터 접근 계층에 사용, 데이터 계층의 예외를 스프링 예외로 변환해준다. -> DB에 관한 에러를 좀 더 잘 검출 할 수 있게끔 도와줌.
- @Configuration : 스프링 설정 정보에서 사용
위의 애노테이션들은 전부 @Component를 포함하고 있기 때문입니다.
참고: 사실 애노테이션에는 상속관계라는 것이 없다. 그래서 이렇게 애노테이션이 특정 애노테이션을 들고 있는 것을 인식할 수 있는 것은 자바 언어가 지원하는 기능은 아니고, 스프링이 지원하는 기능입니다.
참고: useDefaultFilters 옵션은 기본으로 켜져있는데, 이 옵션을 끄면 기본 스캔 대상들이 제외된다. 그 냥 이런 옵션이 있구나 정도 알고 넘어갑니다.
3. 필터
- includeFilters : 컴포넌트 스캔 대상을 추가로 지정한다.
- excludeFilters : 컴포넌트 스캔에서 제외할 대상을 지정한다.
테스트를 작성해보겠습니다. 애노테이션을 간단하게 직접만들어서 애노테이션에 따라 어떤 클래스는 스캔하고, 어떤 클래스는 스캔에서 제외시키겠습니다.
1
2
3
4
5
6
7
8
9
10
11
//MyExcludeComponent.annotation
//MyIncludeComponent도 같은 방식으로 만들어줍니다.
package hello.core.scan;

import java.lang.annotation.*;

@Target(ElementType.TYPE)
@Retention(RetentionPolicy.RUNTIME)
@Documented
public @interface MyExcludeComponent {
}
1
2
3
4
5
6
7
//beanA. java파일
//beanB 자바파일은 애노테이션을 @MyExcludeComponent로 바꿔줍니다.
package hello.core.scan;

@MyIncludeComponent
public class beanA {
}
1
2
3
4
5
6
7
8
9
10
11
12
13
14
15
16
17
18
19
20
21
22
23
24
25
26
27
28
29
30
31
32
33
34
35
36
37
38
39
package hello.core.scan;

import org.junit.jupiter.api.Assertions;
import org.junit.jupiter.api.Test;
import org.springframework.beans.factory.NoSuchBeanDefinitionException;
import org.springframework.context.ApplicationContext;
import org.springframework.context.annotation.AnnotationConfigApplicationContext;
import org.springframework.context.annotation.ComponentScan;
import org.springframework.context.annotation.Configuration;
import org.springframework.context.annotation.FilterType;
import org.springframework.stereotype.Component;

import static org.springframework.context.annotation.ComponentScan.*;
import static org.springframework.context.annotation.FilterType.*;

public class ComponentFilerAppConfigTest {

    @Test
    void FilterScan(){
        ApplicationContext ac = new AnnotationConfigApplicationContext(ComponentFilterAppConfig.class);
        beanA beanA = ac.getBean("beanA", beanA.class);
        //에러 beanA beanB = ac.getBean("beanB", beanB.class);

        //테스트 마무리
        Assertions.assertThrows(NoSuchBeanDefinitionException.class,
                () -> ac.getBean("beanB", beanB.class)
                );

    }
    @Configuration
    @ComponentScan(
            includeFilters = @Filter(type = ANNOTATION, classes = MyIncludeComponent.class),
            excludeFilters = @Filter(type = ANNOTATION,classes = MyExcludeComponent.class)

    )
    static class ComponentFilterAppConfig{

    }
}
결과를 보시면 beanB는 스프링 빈에 들어가지 않은것을 알 수 있습니다.
Type에는 5가지 옵션이 있습니다.
- ANNOTATION: 기본값, 애노테이션을 인식해서 동작한다.
ex) org.example.SomeAnnotation - ASSIGNABLE_TYPE: 지정한 타입과 자식 타입을 인식해서 동작한다.
ex) org.example.SomeClass - ASPECTJ: AspectJ 패턴 사용
ex) org.example..*Service+ - REGEX: 정규 표현식
ex) org.example.Default.* - CUSTOM: TypeFilter 이라는 인터페이스를 구현해서 처리
ex) org.example.MyTypeFilter
따라서 beanA를 위의 코드에서 빼고싶으면 다음과 같이 수정해주면 됩니다.
1
excludeFilters = @Filter(type = ANNOTATION,classes = MyExcludeComponent.class), @Filter(type = FilterType.ASSIGNABLE_TYPE, classes = BeanA.class)
참고: @Component 면 충분하기 때문에, includeFilters 를 사용할 일은 거의 없습니다. excludeFilters 는 여러가지 이유로 간혹 사용할 때가 있지만 많지는 않다고 하십니다.
특히 최근 스프링 부트는 컴포넌트 스캔을 기본으로 제공하는데, 개인적으로는 옵션을 변경하면서 사용하기 보다는 스프링의 기본 설정에 최대한 맞추어 사용하는 것을 권장하고, 선호하는 편이라고 하십니다.
4. 중복 등록과 충돌
컴포넌트 스캔에서 같은 빈 이름을 등록하면 충돌이납니다.
다음 두가지 상황이 있습니다.
- 자동 빈 등록 vs 자동 빈 등록
- 수동 빈 등록 vs 자동 빈 등록
먼저 자동 빈 등록 vs 자동 빈 등록은 ‘ConflictingBeanDefinitionException’라는 에러를 뱉어냅니다.
문제는 수동 빈 등록 vs 자동 빈 등록인데,
원래는 수동 빈으로 등록한 것이 우선권을 가져 기존 빈에 오버라이딩을 했었습니다.
로그도 ‘Overriding bean definition for bean ‘memoryMemberRepository’ with a different definition: replacing’ 이렇게 찍힙니다.
의도적으로 한 것이라면은 다행이지만 의도적이지 않은 것이면 오류잡기가 굉장히 힘들어 집니다.
이러한 문제점이 많이 발생하여 최근 스프링 부트에서는 ‘Consider renaming one of the beans or enabling overriding by setting spring.main.allow-bean-definition-overriding=true’라는 오류를 뱉어내도록 기본 값을 바꿨다고 합니다.


